
Text by BRYAN PERRETT, colour plates by PETER SARSON and TONY BRYAN
BRITISH TANKS in N. AFRICA 1940-42
June 1940
Italy declares war on Great Britain (10th). 7th Armoured Division begins harassing operations against Italians along Egyptian-Libyan border (11th); during next three months the British inflict more than 3,000 casualties, and suffer 150.
September 1940
Italians invade Egypt (13th); they reach Sidi Barrani (18th) and halt to consolidate with chain of fortified camps.
December 1940
Operation 'Compass' (9th): 7th Armd. Div. isolates Sidi Barrani; 4th Indian Div., spearheaded by 7th Royal Tank Regiment, storms camps at Nibeiwa, Tummar West, Tummar Central and Tummar East. 4th Indian Div. and 7 RTR storm Sidi Barrani (10th). Italians abandon Rabia, Sofafi camps and withdraw towards frontier (11th), 7th Armd. Div. pursue; action with rearguard at Buq-Buq (12th).
January 1941
6th Australian Div. and 7 RTR storm Bardia (3rd-5th), Tobruk (21st-22nd). Italians abandon defence line based on Wadi Derna, withdraw through Benghazi (28th).
February 1941
7th Armd. Div. cuts across 'Benghazi Bulge', blocks Italian retreat at Beda Fomm (5th); Italians attempt to break through without success; 6th Australian Div. closes in from north, entering Benghazi (6th). Italian army surrenders (7th). February-March, increased Luftwaffe activity over N. Africa; advance elements of Rommel's Afrika Korps arrive in Tripolitania.
March 1941
Rommel attacks, breaking through British at El Agheila to cut across Benghazi Bulge (24th).
April 1941
Benghazi, Msus evacuated (4th); fragmented 2nd Armd. Div. beaten in detail and never re-formed (5th-6th); Gen. Sir Richard O'Connor captured, Derna falls (7th). 9th Australian Div. encircled in Tobruk (13th); German attack repulsed (14th). Rommel takes Halfaya Pass on Egyptian frontier (25th) and captures Solium (28th). Axis domination of frontier zone complete.
May 1941
Operation 'Brevity' (15th): Halfaya, Solium temporarily recaptured, but operation fails elsewhere.
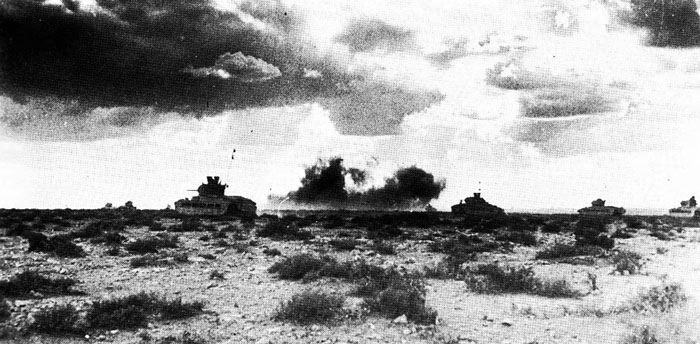
Silhouetted against the early morning sky, Matildas of 7 RTR attack the Sidi Barrani perimeter on 10 December 1940. (Imperial War Museum-as are all photographs not specifically credited elsewhere)
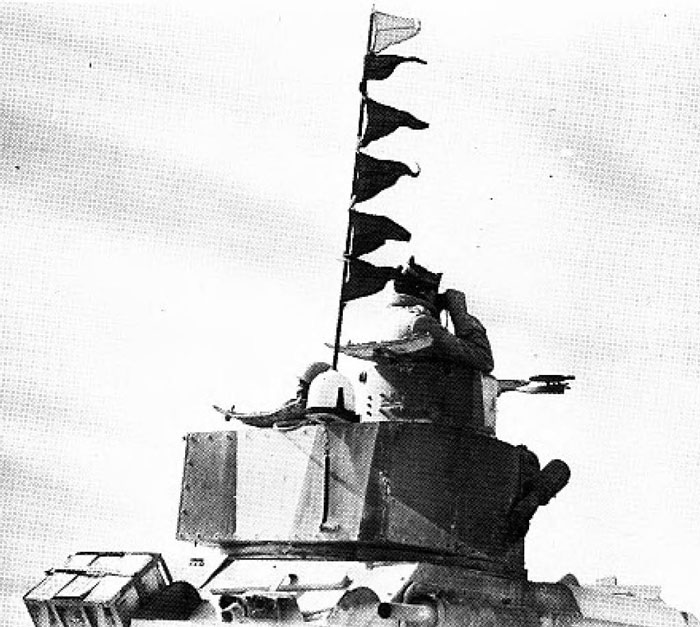
8th Hussars Mk VIB, its multiple pennants identifying a navigator's tank-see sun compass bracket. Some units preferred this method to the more conventional blue or long black flag, as being less obvious to the enemy; these pennants may be in green/black/green, with the top one in yellow unit seniority colour.
June 1941
Operation 'Battleaxe' (15th-17th): British repulsed at Halfaya and Solium, but take Fort Capuzzo. In south, 7th Armd. Bde. drive towards Tobruk blunted, and weakened by mechanical problems of Cruiser tanks. British successfully disengage, withdraw into Egypt. Each side loses approx. 100 tanks, but DAK able to recover most of theirs.
July 1941
Gen. Wavell, unfairly blamed for failures in Greece and during 'Battleaxe', replaced by Gen. Sir Claude Auchinleck as C-in-C Middle East (1st).
November 1941
Operation 'Crusader', to relieve Tobruk and destroy Axis in Libya, begins (18th). British armour comprises 7th Armd. Div. with three armd. bdes. - 4th, 7th, 22nd - in 30 Corps; 1st Army Tank Bde. supporting 13 Corps on coast; and 32nd Army Tank Bde. leading Tobruk garrison break-out. 22nd Armd. Bde. fights Italian Ariete Armd. Div. inconclusively near Bir el Gubi (19th). 'Multi-layer' tank battle develops SE of Sidi Rezegh, leaving British armour weakened and in confusion (21st-23rd); but Tobruk garrison consolidates gains. Rommel attempts to provoke withdrawal by raid into British rear - 'the Dash to the Wire' (24th); but British com-mand refuses to panic and uses respite to reorganise. Led by 44 RTR in brilliant night attack, 2nd NZ Div. links up with Tobruk garrison (26th). Alarmed, Rommel returns from frontier (27th); Axis troops are gradually forced to abandon rest of their siege perimeter (27th - 5th Dec.).
British Operational Code Names
| 'Aberdeen' | 8th Army's attack on the Cauldron, 4/5 June 1942 |
| 'Battleaxe' | Wavell's attempt to relieve Tobruk, June 1941 |
| 'Brevity' | Attempt to regain control of Egyptian frontier zone, May 1941 |
| 'Bulimba' | Australian attack with Valentine tank support, Sept. 1942 |
| 'Compass' | Attack on Italian positions at Sidi Barrani, Dec. 1940 |
| 'Crusader' | Relief of Tobruk and recovery of Cyrenaica, Nov.-Dec. 1941 |
| 'Fullsize' | 50th Div. and 1st Armd. Div. attack under 13 Corps, 18/19 March 1942, to neutralise Axis airfields as Malta convoy passes; 8 RTR and dummy tank units involved |
| 'Lightfoot' | Opening phase of Second Alamein, October 1942 |
| 'Manhood' | 30 Corps attack using elements of 23rd Arm. Bde. and 'A' Force deception units, 26 July 1942 |
| 'Sentinel' | Deception scheme to create impression of large Aug./Sept. 1942 reinforcements in rear of hard-pressed 8th Army |
| 'Sinbad' | 'A' Force deception operation to test Axis strength in Bir Tegender area, 29-30 April 1942 |
| 'Splendour' | 13 Corps attack, 22 July 1942 |
| 'Supercharge' | Break-out phase of Second Alamein, Nov. 1942 |
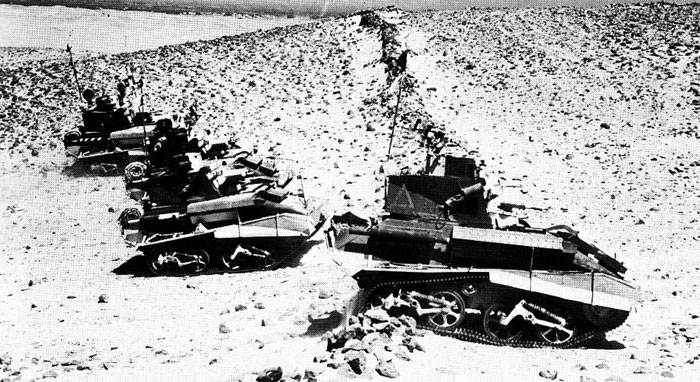
Light tanks Mks VIA and VIB photographed in August 1940. Spotlights were standard on the tanks of 1 and 6 RTR; and one tank from each squadron of the 6th was lent to 7th Hussars for a night attack on Fort Capuzzo on 29/30 June 1940, two of them using their lights to dazzle and confuse Italian gunners.
December 1941
Severe losses and supply difficulties oblige Rommel to withdraw from Cyrenaica, and conduct fighting withdrawal to El Agheila (6th-30th). Bardia stormed by 2nd South African Diw, 8 and 44 RTR in support (31st).
January 1942
Axis garrison at Halfaya surrender (17th), 'Crusader' has cost Axis 300 tanks and British 278-but many of latter are recoverable. Reinforced, Rommel attacks anew (21st), breaking through outpost line at El Agheila, moving through Msus, and outflanking Benghazi, which falls (29th).
February 1942
8th Army stabilises line at Gazala (5th). Both sides prepare for fresh offensive for four months.
May 1942
Panzerarmee Afrika wheels round southern end of Gazala line at Bir Hacheim (26th-27th), but is brought to standstill after heavy fighting with 1st Armd. Div - 2nd, 22nd Armd. Bdes - and 4th Armd. Bde. of 7th Armd. Div.; Rommel is forced onto defensive, with his back against British minefields. Lt. Gen. Ritchie, GOG 8th Army, fails to take concerted action against Rommel's 'Cauldron' position (28th-4th June), which is strengthened. Rommel overwhelms 150th Bde, Box across his rear, almost destroying 1st Army Tank Bde. in process (31st).
June 1942
Attacks on Cauldron by 22nd Armd. Bde. from east and 32nd Army Tank Bde. from north repulsed with heavy loss; enemy counter-attack overruns 10th Indian Inf. Bde - (5th). Ritchie fails to co-ordinate adequate relief operations for besieged Free French Box at Bir Hacheim (6th-10th); French break out successfully (10th). Rommel renews his original NE thrust, inflicting serious tank losses on British in actions around 'Knightsbridge' track junction (11th-13th). Ritchie orders retreat into Egypt, prepares Tobruk for second siege, Tobruk stormed and surrenders (20th), with loss of 2nd SA Div., 201st Guards Bde., 11th Indian Inf. Bde., and two of the Royal Armoured Corps' finest regiments, 4 and 7 RTR. British morale reaches lowest ebb; 8th Army continues retreat to Mersa Matruh, and Auchinleck assumes personal command (21st-25th). Rommel, maintaining close pursuit with handful of tanks, penetrates gap between British 10 and 13 Corps, causing disorderly withdrawal from Mersa Matruh to El Alamein (26th). 6 and 8 RTR destroy 20 of Italian Littorio Div.'s 30 tanks at Bir el Tamr-a significant check, given total Axis tank strength of approx. 50 (30th).
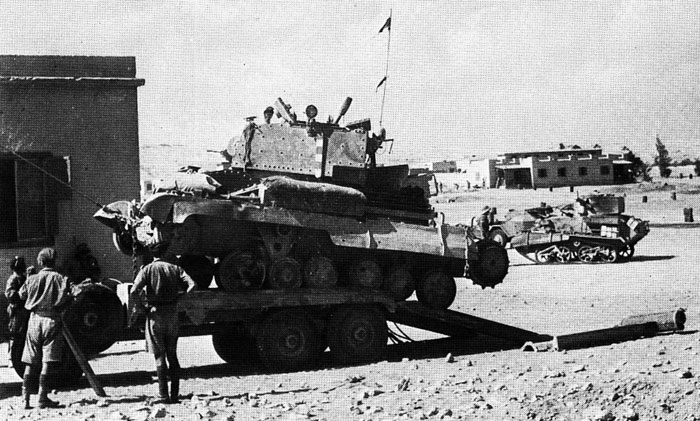
Before the arrival of the Diamond-T Transporter the recovery of untowable 'dead' tanks was more difficult. This A9 is being hauled on to a light trailer for 'back-loading'; the striped bar on the turret may identify a navigator's tank.
July 1942
Start of series of engagements known as '1st Battle of Alamein'; 1st Armd. Div. checks DAK's advance (1st). 1st Battle of Ruweisat Ridge (14th-15th): heavy fighting at Tel el Eisa; Alamein line consolidated. 2nd Battle of Ruweisat Ridge (22nd) - Operation 'Splendour': 23rd Armd. Bde. lose 93 of 104 tanks. Both sides reach limit of their resources as 1st Battle of Alamein ends.
August 1942
Gen. Sir Harold Alexander replaces Auchinleck as C-in-C Middle East (13th) ; Lt. Gen. Bernard Montgomery assumes command of 8th Army. Battle of Alain Haifa (31st-7th September): Rommel attempts to repeat movement which had won him 'Knightsbridge', but his anticipated advance is slowed by 7th Armd. Div., and stopped by 10th Armd. Div. - 8th, 22nd and 23rd Armd. Bdes. DAK withdraws behind its own lines.
October 1942
2nd Battle of Alamein begins - Operation 'Light-foot' (23rd). Attempted break-through by 7th and roth Armd. Divs. stalled by Axis defence (24th-25th). 1st Armd. Div. in heavy fighting at Kidney Ridge (26th-27th). 23rd Armd. Bde. continues to support infantry 'crumbling' attacks on northern sector (28th-30th). 40 RTR repulse counter-attack on 9th Australian Div. at Thompson's Post (31st).
November 1942
Operation 'Supercharge': 7th Armd. and 2nd NZ Divs. break through (2nd-3rd); Rommel begins withdrawal. Axis casualties total approx. 59,000 men, 500 tanks, 400 guns; 8th Army casualties approx. 13,000 men, and 432 tanks disabled. Pursuit delayed by fuel shortage and heavy rain (5th-7th). (Operation 'Torch' - landing of Anglo-American 1st Army in French North Africa - takes place on the 8th. New arrivals include 6th Armd. Div., with 26th Armd. Bde.; and 21st and 25th Tank Bdes.) 8th Army enters Bardia (11th), Tobruk (13th), Benghazi (20th).
December 1942
Rommel withdraws from E1 Agheila 'bottleneck' (13th); 8th Army reaches Sirte (21st). Logistic problems reduce the Army to 30 Corps during advance through Tripolitania: 7th Armd. Div., 2nd NZ Div., and 51st Highland Div., with 23rd Armd. Bde.
January 1943
8th Army breaks through Axis position at Buerat (16th); occupies Homs (19th); enters Tripoli (23rd).
February 1943
On the 4th, 8th Army reaches the Tunisian frontier.
***
It seems logical to set a period to this book at this point, the character of, and to some extent the units and tanks involved in, the Tunisian campaign being so different from the 'classic' desert period as to require a separate book.
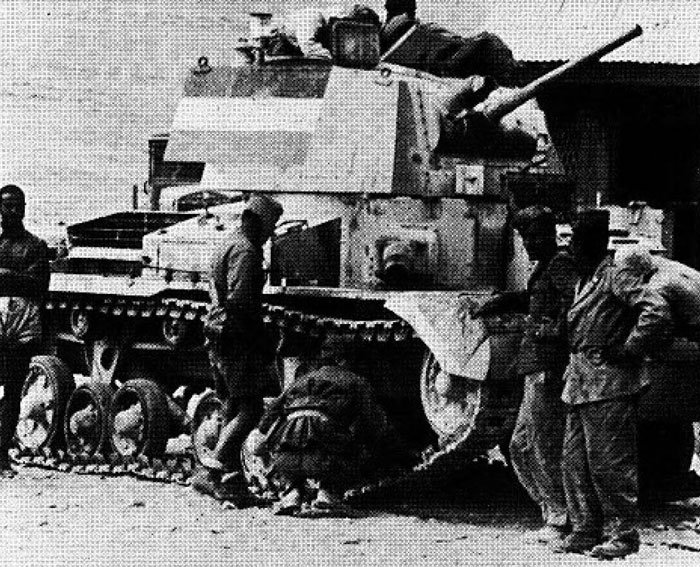
A9, believed to be in use by the Italian 63rd Tank Bn. in 1940. It may be T.3536 of 'A' Sqn., 1 RTR, abandoned on 14 September 1940 when its tracks were blown off by artillery fire, and removed by Italian forces. Later Intelligence reports suggested that the Italians were using a Cruiser to penetrate night leaguers by deception; and as late as July 1942, HQ 2nd Bn., 27th Inf. Regt., Pavia Div. was reported to have a British tank and an armoured car on strength. Whether these were all the same tank is, of course, open to conjecture; but the Italians were not in a position to capture many British tanks. (Martin Windrow)
For many Britons, particularly among the older generations, the campaign in North Africa has a nostalgic appeal, and indeed a glamour, which has never been associated with the fighting in Italy, North-West Europe and Burma. The reasons are largely emotional but entirely understandable, as for three years it constituted the only lasting contact between the British and Commonwealth armies and those of the Axis powers. Again, there is a long British tradition of wars fought successfully in the remoter areas of the globe and, however many setbacks might be encountered along the way, this was accompanied by a justified national confidence in eventual victory.
As the years have passed so too have generalisations about the campaign multiplied; and although such generalisations may contain a core of truth, they do bear examination. Most commonly heard among detractors is the complaint that Britain was forced to deploy a high percentage of her available strength in the area, whereas Germany employed only a handful of divisions. This fails to take into account the fact that the Commander-in-Chief Middle East was also required to mount simultaneous operations over a vast area including Persia, Iraq, Syria, Eritrea, Ethiopia and Somaliland; and that on two occasions, when victory seemed to be within his grasp, he was forced to send very substantial reinforcements to other theatres. Thus, having utterly routed the Italian army at Beda Fomm in February 1941, Wavell was immediately required to send troops to Greece; while in December of that year, with Rommel still retiring from the 'Crusader battlefield, Auchinleck was ordered to strip his command of some of his best formations and send them to counter the Japanese offensive in the Far East. Neither does this view admit that in spite of committing most of her strength to this theatre as well, Italy was virtually knocked out of the Axis alliance; nor the fact that had Germany employed more good-quality troops, and above all kept them properly supplied, she might have produced a result more favourable to herself - as it was, OKW favoured a limited involvement which tied down numerous British divisions in defence of the Middle East's vital oil-producing areas when they would otherwise have been preparing for a return to the mainland of Europe.
Many, too, hold the attractive but simplistic view that an immediate advance on Tripoli after the victory of Beda Fomm would have ended the campaign in early 1941. Wavell had destroyed the Italian field army and turned Cyrenaica into a buffer zone; in view of the urgent orders to reinforce Greece, Tripoli was an irrelevance. While Gen. O'Connor believed that captured stores would have enabled him to reach Tripoli, there seemed at the time no reason for such a march. Few could have foreseen the outcome of Rommel's first bold probing attack, described by Haider, Chief of the German General Staff, as the action of 'a dangerous lunatic'.
Although the British Army had, over the years, acquired as much desert experience as any other, the fact remained that in 1940 no one had fought a fully mechanised desert campaign, and few knew what to expect. That the British were initially better prepared than the Italians is a tribute to the demanding exercises instituted by Maj. Gen. Percy Hobart, commander in 1939 of the Mobile Division Egypt - later, 7th Armoured Division. As the Italians became more mechanised they too learned to operate in the desert ; and the Germans adapted to it very quickly. Apart from such special units as the Long Range Desert Group, there was in the end little to choose between the desert-craft of the different armies. There was, however, one important flaw in the British philosophy, which cursed the conduct of armoured operations for fully a year.
We have much more interesting information on this site.
Click MENU to check it out!
∎ cartalana.com© 2009-2025 ∎ mailto: cartalana@cartalana.com