
Text by BRYAN PERRETT, colour plates by PETER SARSON and TONY BRYAN
BRITISH TANKS in N. AFRICA 1940-42
For Operation 'Lightfoot' 46 RTR of this brigade were issued with twelve 'Anti-Mine Roller Attachments' or 'Fowler Rollers'. Five Valentines so fitted joined the unit on its march to the start line and then led the tanks into battle on 23 October. They were used again on the 28th, and proved a useful addition to the RE gapping teams and Scorpions, who suffered heavy casualties both from mines and from aimed fire. By the time the minefields were breached all five Valentines were out of action, taking no further part in the Alamein operations. Photos indicate a general colour scheme very similar to 'Cheetah', completely without insignia.
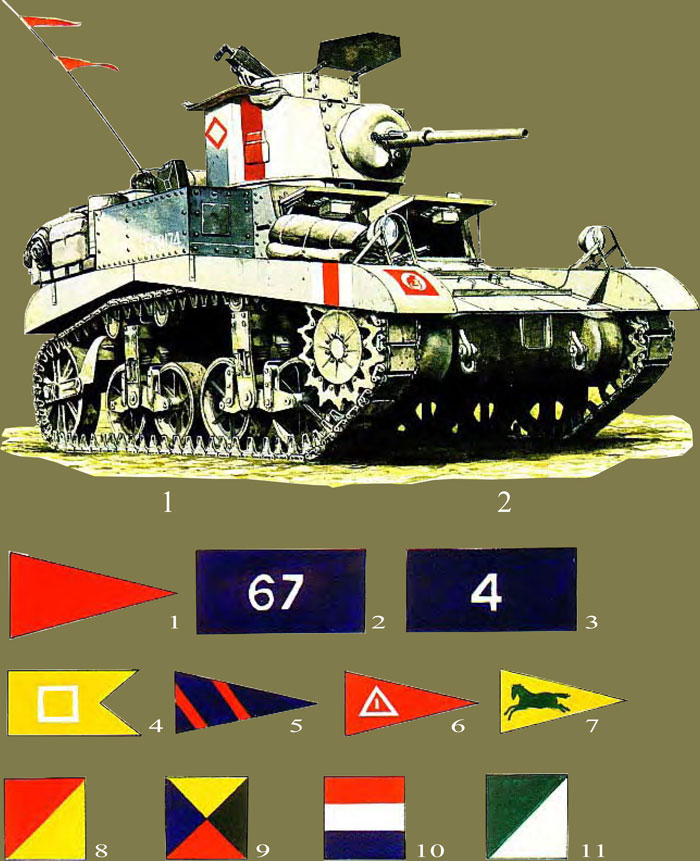
F1: Light Tank M3, Stuart 1, Brig. A. Gatehouse, HQ Sqn., 4th Armoured Bde., 7th Armoured Div.; Operation 'Crusader', November 1941
For 'Crusader' the whole brigade was equipped with 'Honeys'; and although outranged and under-armed in comparison with the German tanks they gave a good account of themselves by the use of flexible tactics and superior speed, under the calm direction of Brig. Gatehouse. The brigadier exercised this control from a comfortable deck chair on the rear deck of his own 'charger', which we illustrate here.
Gatehouse was luckily absent when the night leaguer of the Brigade HQ and the 8th Hussars was overrun by a German battle-group. He later rose to command 10th Armoured Div, at Alamein. His M3 is unremarkable; it is finished in Light Stone and Silver-Grey, with white-red-white flashes on turret side and front dustguards, the HQ diamond in red on the turret, the divisional sign on the left front dustguard as viewed, and the WD number T.28174.
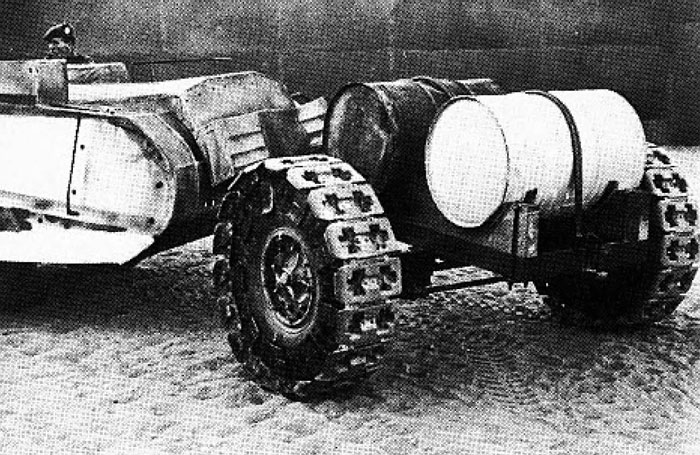
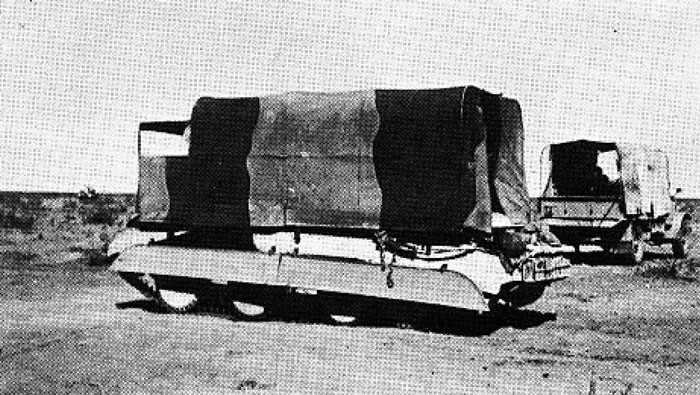
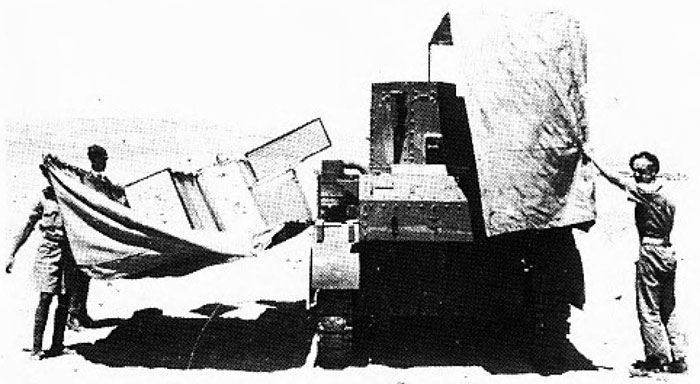
Wolves in sheep's clothing, and sheep in wolves' clothing ... Dummy tank units to misdirect enemy Intelligence were created in 'gaps' in the RTR numbering sequence; '30', '60' and '100' series RTR battalions appeared and disappeared at the behest of 'A' Force and its commander, the remarkable Brig. Dudley Clarke. During Operation 'Crusader' two such units, 10 RTR and 'F' RTR, successfully threatened the German flank from concentrations around Siwa and Giarabub. In December 1941/January 1942 1st Army Tank Bde. had an extra Crusader regiment, 101 RTR; while 37 RTR ostensibly plugged the hole blown in 4th Armd. Bde. in November 1941 with 52 dummy M3S. (These units were manned by small detachments of tank and infantry troops- a dummy tank requires only a driver.) Dummies mingled with real units in the bitter May-August 1942 fighting, persuading the DAK that they were dummies. 'Sunshields' or truck disguises were continuously used to conceal tank strength until the moment of contact. Operation 'Bertram', the cover plan for 'Lightfoot', saw the fake 74th Armd. Bde. - 39, 118, and 124 RTR - moving into the positions vacated by the real armour when it moved up to battle positions for Second Alamein. The photos show: (below) mobile 'Crusaders', beautifully made of lath and canvas and flawlessly painted. These 101 RTR vehicles are built on trucks - note the exposed driver's position ahead of the fake turret (top). The track-marking trailer towed behind them to fool air recce (right) Truck disguises worn by an A13 and a Stuart
F2: Aerial pennants and signal flags
The use of aerial pennants fell into four main categories: (a) identification, friend or foe; (b) seniority within a unit or formation; (c) rank or position indicators; and (d) the passing of visual messages or orders.
Basic identification was by the number and position of small triangular pennants flown on a particular day or for a particular operation, as instructed by higher formation orders. Colour was not distinguishable at any distance, so position was the main identification; many of the colour plate captions give specific examples of these - e.g. 'two top', a popular formula, since it allowed ID at the greatest possible distance. Since units in the desert were far from sources of supply, replacement pennants were often improvised, more or less carefully. (As a general comment on the whole use of pennants, one should bear in mind not only the impossibility of operating a complex system under combat conditions, but also the British Army's cherished tradition of 'tribal peculiarities'.)
The colour of the ID pennants was normally determined by seniority of a squadron within a regiment or a regiment within a brigade, based on the sequence red, yellow, blue; if necessary to accommodate more units, green and white were supposed to be used by fourth and fifth senior units. Thus the senior (oldest) regiment in a brigade flew red pennants, and so forth. Since units were transferred fairly frequently, however, and since a replacement unit might be of greater or lesser seniority than the original unit according to which 17th-, 18th- or 19th-century war had led to its original formation, these colours changed around within brigades at intervals. There is no point in trying to generalise from the particular, and no substitute for direct reference if trying to determine the colour flown by any given unit at any given date.
Rank and position flags and pennants varied considerably, but systems officially prescribed were obeyed in at least some cases. These flags were normally flown in addition to basic ID pennants. Variants in regimental or corps colours, with the addition of regimental or formation signs, were quite common.
Plate F2/1 is a brigade commander's pennant. 12ins. × 36ms., in the red adopted for the Light Bde. commander in early 1940; a similar pennant in green was flown by the Heavy Bde. commander, and the designs seem to have been retained when the designations were changed to 'senior' and 'junior' brigades within a division. See the typically free variation flown by Brig. Willison on Plate B1, however; and note that there was also some use of a 6in. × 9in. blue pennant by brigade commanders.
F2/2 is a battalion or regimental (depending on whether RTR or cavalry) commander's flag, 18ins × 36ins., in the colour of seniority within the brigade and bearing the unit serial number, as painted on the front and rear of the tanks. In this case it is the '67' on blue of 10th Hussars, 2nd Armd. Bde., 1st Armd. Div. in February 1942. A regimentally-coloured alternative is F2/3, that flown by Col. O'Carroll of 4 RTR for the Tobruk break-out battles. This is in the blue that has always been the distinctive colour of 4 RTR, and bears the actual battalion number. There are reports of flags in the RTR's brown, red and green stripes bearing actual battalion numbers; but a photo of this tank certainly appears to have a single-colour pennant.
F2/4 shows a regulation squadron commander's swallow-tailed pennant, 9ins. × 19ins., in regimental or squadron seniority colour (according to unit practice). It bears the squadron mark in white - here, the square of 'B' Sqn. on the yellow of either 'B' Sqn. or the second senior regiment in the brigade. Plain rectangles of colour, with or without squadron signs, were also common.
F2/5 demonstrates a troop commander's pennant, 9ins. × 13ins.; officially these were supposed to be made with a base of the squadron colour (red, yellow or blue), with two 2-in. bars of troop colour (red, yellow, blue, green, or white) applied diagonally. Thus the combination shown is for the leader of 9 Tp., the first troop of 'C' Sqn. - red bars on blue. When troop and squadron colour coincided it seems that the base was supposed to be black edged in squadron colour - e.g. 1 Tp. leader, 'A' Sqn. would fly a black pennant edged in red with two red bars. The maintenance of this wildly bureaucratic system under combat conditions must have been totally impossible in most cases.
Common alternatives were as F2/6 - in squadron colour, bearing either a troop number or a combination of squadron mark and troop number: here, 1 Tp., 'A' Sqn. Less common was the sort of unit design shown as F2/7; it is believed that 3rd Hussars used squadron-colour pennants bearing the regiment's 'horse of Hanover' badge in troop colour - here, 8 Tp. commander in 'B' Sqn.
Flags used for passing orders or messages - normally hand-held on sticks, but in some cases they might be attached to aerials-remained basically the same throughout the campaign. F2/8 is 'I am out of action'. From about April 1941 a plain red square was used for 'I am out of action in a minefield', after too many tanks had been lost going to investigate the original signal flown by a comrade. F2/9 is the order flag for 'Action'; F2/10, 'Rally'; and F2/11, 'Come on'.
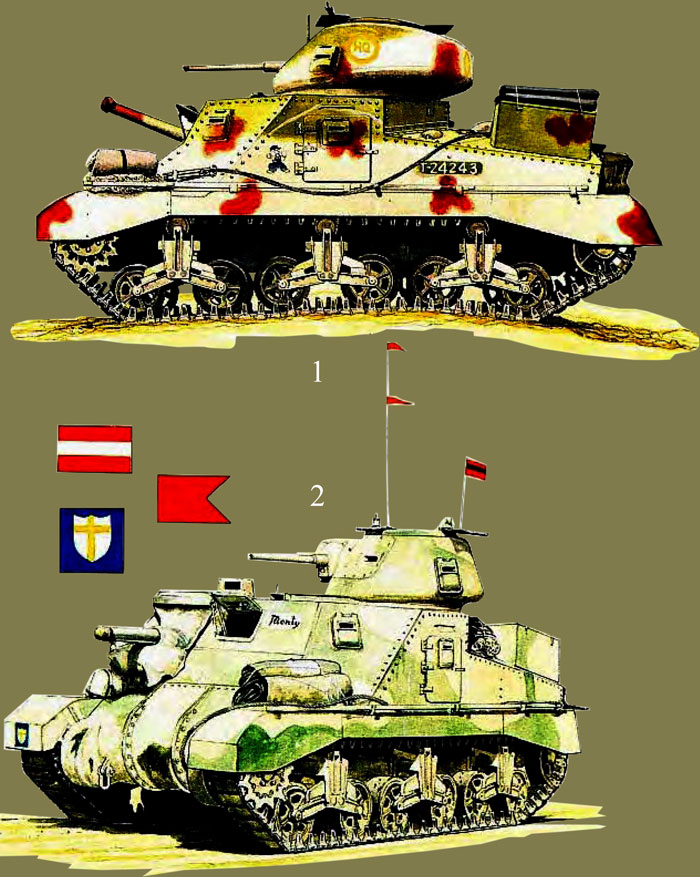
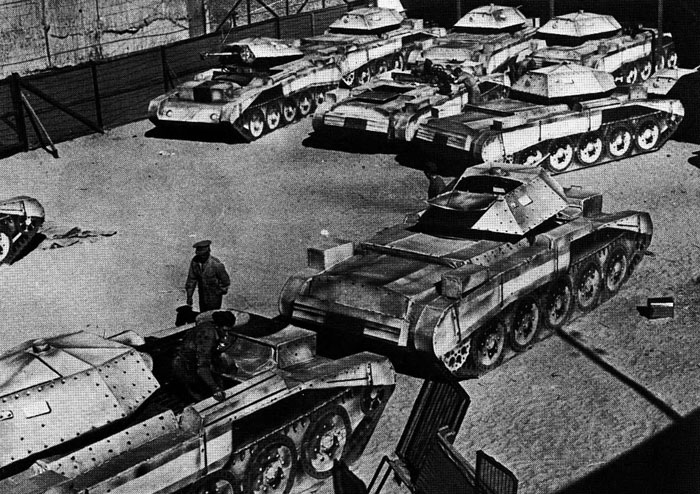
G1: Grant I, 'C' Sqn., 3 RTR, 4th Armoured Bde., 7th Armoured Div.; Gazala operations, May 1942
This unit, photographed in transit, had neatly painted tanks with highly professional insignia of cartoon characters - this example seems to be one of Walt Disney's 'Three Little Pigs' in fighting mood. The camouflage colours appear to be Light Stone, partially sprayed over the original Olive Drab, with blotches of Purple-Brown. Sadly, T-24243 was reduced to smoking junk at Bir Harmat on 30 May, along with three of its companions; but 15th and 21st Panzer had also received a lacing.
G2: GOC's Grant, GHQ Troop, Protection Sqn., 8th Army Tac. HQ; Operations 'Ligktfoot', 'Supercharge' and 'Fire-Eater', October 1942 - January 1943
When Montgomery took over the 8th Army he decided not only to have a tactical HQ divorced from the bustle of Main HQ, but also to have an armoured element in this. The HQ was formed from elements of 6 RTR, who were re-forming after the Knightsbridge battles, plus armoured cars from British and South African units at different times, and a LAA Battery. GHQ Troop of the squadron consisted of the GOC's 'charger', a modified Grant, and a second for his Chief of Staff, both delivered on 13 October 1942. At the general's own suggestion his Grant was named 'Monty'. The crew were Maj. J. Poston (nth Hussars), ADC to the GOC; Lt. J. Mouldon, mc (6 RTR), radio operator; Sgt. 'Paddy' Kennedy (6 RTR), main gunner; Tpr. Fegan (6 RTR), loader; and Cpl. J. Fraser, BEM, mm (6 RTR), driver. The tank was finished in Green over Desert Pink; it bore the 8th Army sign on the front left dustguard, as viewed, and the name in black fancy lettering on white. Both the standard recognition pennants and the GOC's own personal flag in red/black/red were flown from the aerials. (A similar flag in red/white/red identified a Corps commander, and a red swallow-tail of this size a Divisional commander.)
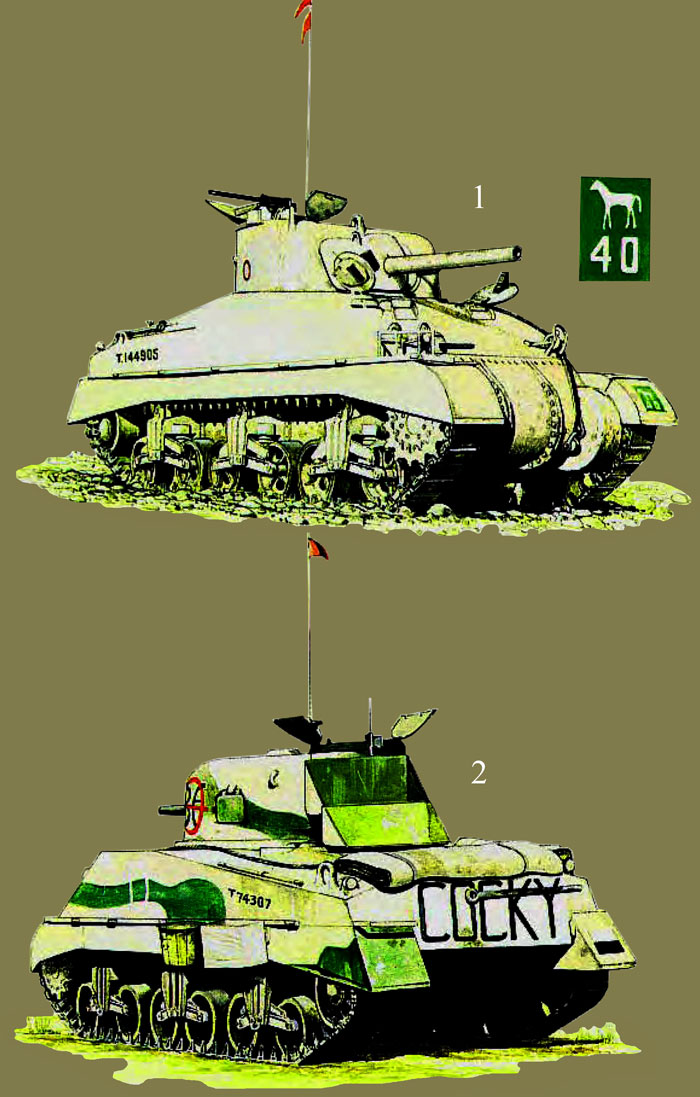
H1: Sherman II (M4), 'C' Sqn., 3rd The King's Own Hussars, 9th Armoured Bde.; 'Meet of the Grafton Hounds' - Operation 'Supercharge', 2 November 1942
9th Armoured Bde. were employed as a steel bludgeon to smash in the Axis 'PAK-front' on the line designated 'Grafton' - this being a compliment to the MFH of the Grafton Hounds, who served with the Royal Wiltshire Yeomanry. One hundred per cent casualties were deemed acceptable to achieve the objective, and this was nearly the price the regiments of this all-cavalry brigade paid. Shermans were received very late by these units and there was little time to apply either camouflage schemes or regimental names; some carried the bare minimum of markings, as here - the squadron tactical mark, the WD number, and the brigade formation sign and unit serial number. The RAF roundel was probably carried on the rear decking - see Vanguard 15, 'The Sherman Tank in British Service', Plate A. Pennants were flown in the 'position of the day' in seniority colours - red for 3rd Hussars, yellow for the Royal Wiltshire Yeomanry, and blue for the Warwickshire Yeomanry. The white fernleaf on black of 2nd New-Zealand Division was added after the operation, as a 'battle honour'.
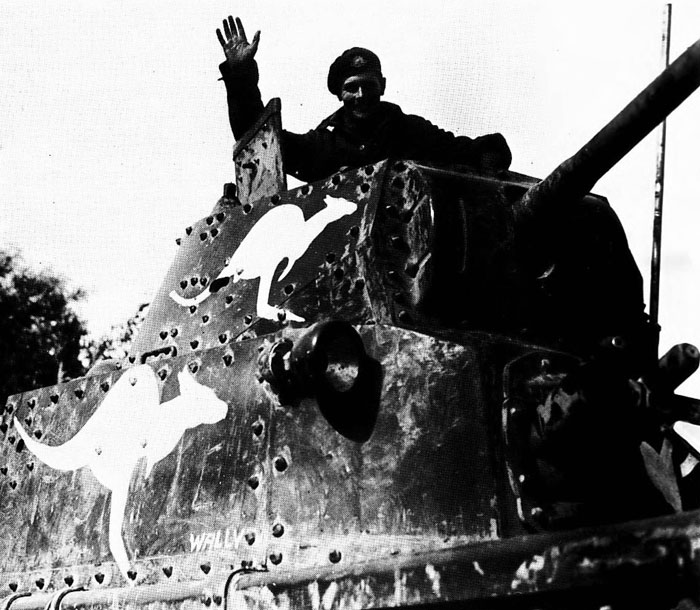
The only Commonwealth tanks in the desert were Australian and New Zealand divisional cavalry regiments, whose role was reconnaissance and flank protection. 6th Aust. Div. Cav. arrived in 1940 with carriers; on the fall of Bardia in January 1941 its 'A', 'B' and 'C' Sqns., known as 'Dingo', 'Rabbit' and 'Wombat' respectively, acquired Italian armour which they used for a short period, abandoning them as they broke down or ran dry. 'Dingo' had five M.11s and one M.13, and penetrated as far as the harbour during the Tobruk assault of 21 January; the other two squadrons each had two M.13s. In early 1941 the 7th and 9th Aust. Divs. arrived, the former minus its cavalry unit; and the 6th and 9th fought impressively in Vichy Syria with carriers some Light tanks, and, briefly, captured R-35s. 6th and 7th Divs. left the Middle East early in 1942; 9th Div. Cav. was hastily re-equipped with Stuarts and Crusaders and brought from northern Syria to Egypt. This unit led the break-out in the coastal sector of the Alamein front on 3 November advancing more than 20 miles to ElDaba on that day.
The 2nd NZ Div. Cav. fought with carriers and Light tanks in Greece and during Operation 'Crusader'; re-equipped with Stuarts, they fought at Second Alamein with 9th Armd. Bde., and were prominent in the advance to Tunisia.
The photo shows the white 'roos painted prominently the turrets and hulls of their Italian captures by 6th Australian Divisional Cavalry.
H2: Sherman III (M4A2), ex-41 RTR, 24th Armoured Bde., Operation 'Lightfoot', 23 October 1942; illustrated in use by Royal Scots Greys, 'HoneyHill', December 1942
Shermans of 24th Armoured Bde. retained the 'Go' sign of 8th Armoured Div., and used the unit serial sequence 71, 40, 86, 67. Large tank names were carried on the rear hull, and the RAF roundel on the engine deck. Squadron marks followed the usual colour sequence, but the 41st appear to have used large call-sign numbers on the turret in addition to these.
'Cocky' was knocked out in a minefield during Alamein; was recovered, repaired, passed on to 47 RTR, and then handed over to the Greys for Operation 'Fire-Eater'. The Greys seem to have obliterated the original formation sign, and to have added their own badge-halved white over black, with a green and purple thistle normally superimposed, but not evident on the photo from which we take this painting. 'Cocky' was finally knocked out again in the battle of 'Honey Hill' on 17 December 1942. Note the 'cancelled' call-sign in the 'C' Sqn. circle.
We have much more interesting information on this site.
Click MENU to check it out!
∎ cartalana.com© 2009-2025 ∎ mailto: cartalana@cartalana.com